
Photos Courtesy of the Channel Island Woodturners of Ventura, Calif.
This project is best for those who are experienced making platters and bowls.
This platter will be between 15-17 inches in diameter, with a shallow bowl shape from rim to center that is deep textured using a mini power carver. The center will have a 3-inch medallion that is colored and highlighted with gilding cream.
The wood I use is either maple, walnut, or sugar pine. I find these woods work well for creating the texture using the method I use.
Tools:
- ⅝" and ½" bowl gouges
- 1" radius scraper
- ⅛" parting tool
- point tool or small skew chisel
- Scroll Chuck with 4" jaws
- Woodworm/screw center, or a faceplate
- Arbortech Mini Power Carver with carbide tooth cutter
- Ruler or compass
- pencil
Materials:
- Scotch Abrasive pads/sponges
- 180-400 grit sandpaper
- Black dye
- Black marker/Sharpie, or a small butane torch.
- Gold, silver (or your preferred color) gilding cream.
My preferred finish is Mahoney’s Walnut Oil, as it’s easy to apply and leaves a golden color to the wood. Spray-on satin lacquer.
Step-By-Step Instructions:
- Preparing the Blank: Begin with a platter blank that measures between 15-18 inches in diameter, and no less than 2-inches thick. To mount the wood to the lathe, use a screw center (my preferred method) or a faceplate.
- If using a screw center, place a spacer on the threads to shorten the screw so you can drill a shallower hole, which makes it easier to turn away the drilled hole. Drill a hole centered on the top of the blank, a little deeper than the length of the screw with the spacer in place.
- If you are using a faceplate, center the faceplate on the top of the blank and attach using sheet metal or steel wood screws 1 ¼" long.
- Mount the blank to the lathe and spin by hand to check clearances and balance of the blank. When everything is satisfactory, you are ready to move on to turning the blank. Use your tailstock with a live center for extra support.
- Balancing the Blank: Start your lathe at a low speed and gradually increase the speed to where you feel most comfortable, and there is NO VIBRATION. I usually begin cutting with a speed between 700-800 rpms.
- Using a ⅝" bowl gouge, begin with balancing the rim by cutting towards the headstock and the gouge at a 45-degree angle. Continue until the rim is running balanced and true.

balance/wobbling, use the ⅝” gouge to
make scraping cuts from center to rim, or
make step cuts, until the blank is
balanced.
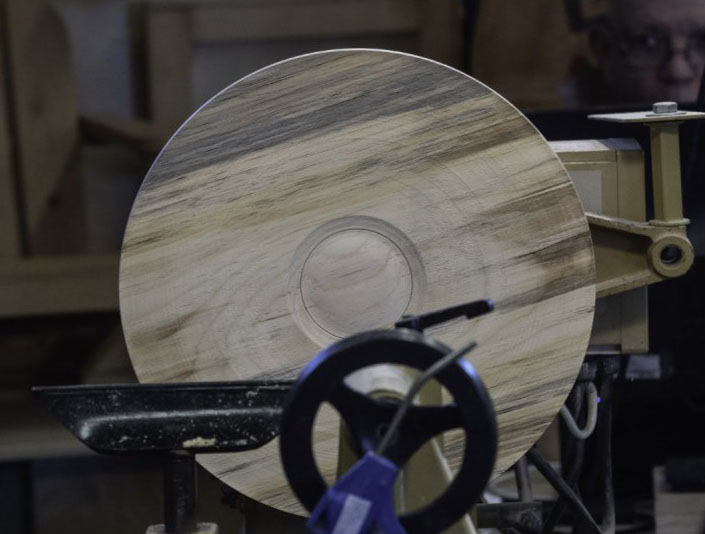
Shaping The Bottom: There are a few ways you can go about shaping the back of the blank to create the convex shape shown in the diagram above. Using a ⅝" or ½" bowl gouge you can…
- use a scraping cut starting from the center to the rim.
- Use a push cut from the center to the rim, or
- Make step cuts starting at the rim and working your way to the center. This is my preferred method to cut the overall shape of the bottom, as you can remove wood quickly.
- Once I have the general shape, I use a shear scraping cut using a ½" bowl gouge to fine tune the final shape. I then use a 1" radius scraper to shear scrape the bottom to remove any high spots and tool marks left by the gouge.
- Sand the bottom of the piece starting with 180-grit sandpaper and work up to 400-grit.
- If you would like to forgo the sanding, you can texture the bottom using the ‘Deep Texturing’ instructions to follow.
- Cut the recess with a dovetail shape that matches the dovetail of the jaws on the chuck. Make sure to cut a flat area in the bottom of the recess for the top of the chuck jaws to rest on.
- I also like to create a bit of detail inside the recess using a chatter tool or the small Sorby Texturing Tool. It’s not necessary, although it does add a bit of detail on the bottom, and it seems everyone likes to take a look there when they pick up the piece (see photo).
- Using a ⅝" bowl gouge, true up the face of the blank to remove any runout using the same method in Step 2 so the blank is running true with no vibration.
- Use a push cut just as you will for creating a bowl.
- Use a scraping cut starting at the center and cutting to the rim. 3. A step-down cut starting at the rim and moving towards the center. Do not cut in the area marked for the medallion.
When you are halfway to the desired thickness of the blank, stop cutting so the medallion can be finished.
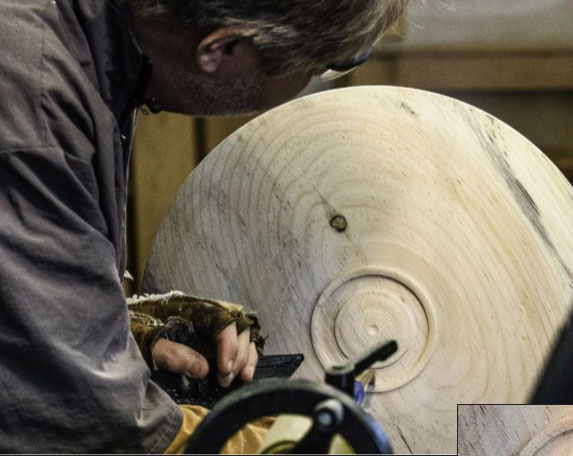
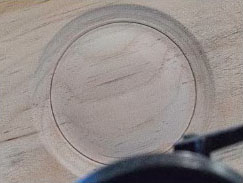
- Using a parting tool, cut a ¼" wide groove ⅜" below the surface. Using the ½" bowl gouge, cut a convex/dome shape from the groove to the center. Next, cut a concave shape (see photo) a ½" wide down to the outside diameter of the medallion. Sand the medallion with 180-grit sandpaper to remove any tool marks left by the gouge. Leave the extra thickness around the medallion, as this will be cut away after the design elements are completed.
- To make the medallion standout, you can use various techniques. You can dye the center black, use a black Sharpie or paint pen to color the center black, or burn it using a small butane torch. (Warning: If using a torch, always make sure the area you are burning in is completely free of flammable items. Remove all shavings and dust around your work area and have plenty of ventilation). When possible, I do my burning outside on a cement driveway or patio, removing the blank from the lathe while still attached to the scroll chuck. If burning, use a soft brass brush to remove any soot and residue from the burned area when the burning is complete.
- When you have finished with coloring the center, use gilding cream to fill in the grain of the wood. Rub it in well to fill in all the open grain. Remove the excess gilding cream using a clean paper towel with the lathe running at 400 rpms. Always use a clean portion of the paper towel to remove the cream. Turn off the lathe periodically to check the progress. When you are happy with how it looks, stop there.
- To finish and seal the gilding cream, spray on a couple of coats of satin lacquer.
- Using the 1" radius scraper, make a finishing cut by turning the scraper up to a 450 angle to shear scrap the inside to remove any high spots.
- I like to keep the thickness at the rim ⅜" thick, and then gradually thicker as you move towards the medallion. This extra thickness is necessary for the texturing of the piece. When the cutting is done, use 180-grit sandpaper to remove any tool marks left by the gouges and scraper.
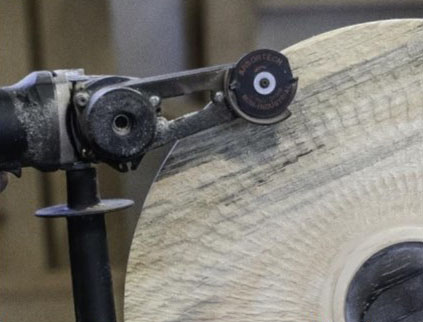
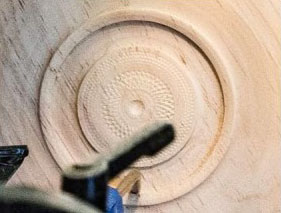
To create the deep texture on the platter, I use a mini power carver. There are a few brands of carvers that can be used to create the texture. The Proxon Mini Carver, the Merlin Mini Carver, and the one I recommend and will be using for this project, the Arbortech Mini Power Carver. I have found that the carvers that
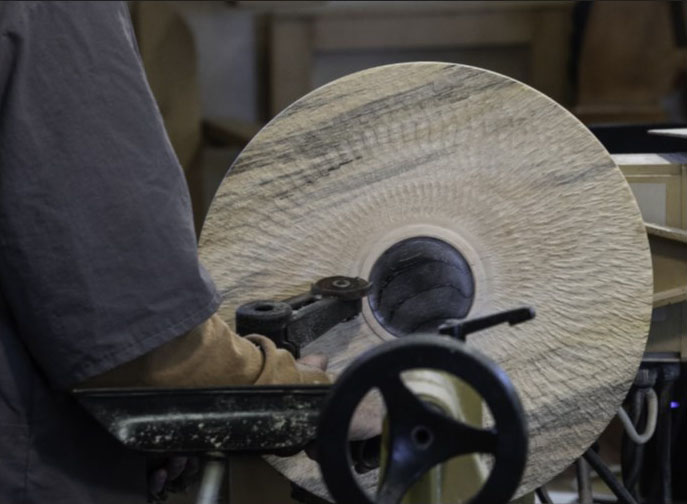
have the chainsaw style blades tend to make choppy cuts instead of a pattern like that shown in the photo. I also use the carbide blade that has two teeth. (I recommend practicing on your blank before beginning the final texturing. I still do this, as all wood is different and will react differently to the texturing. After following Step 2. Balancing the Blank, you can practice texturing cuts on the bottom of the blank. Start about three inches from center and use the methods described in this section. After practicing, just turn away the texture and continue with Step 3).
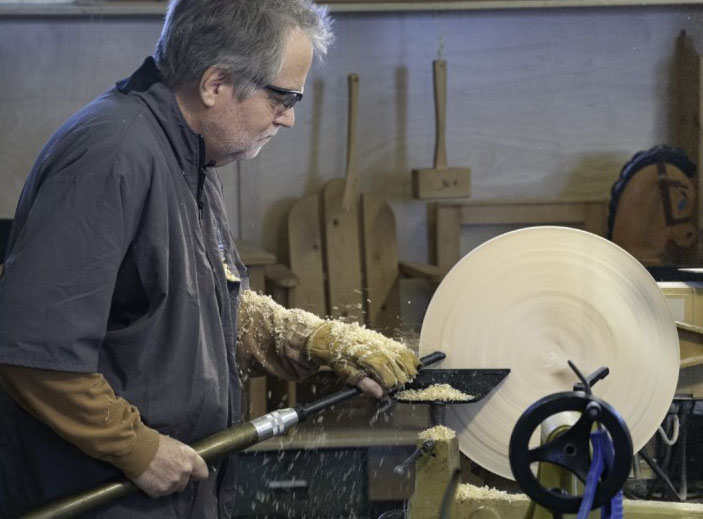
- Turn on the lathe to a speed between 350-400 rpms. This is important. Too fast and the carver will skip and bounce across the wood. Too slow and it will dig into the wood. I learned this through hours of practice.
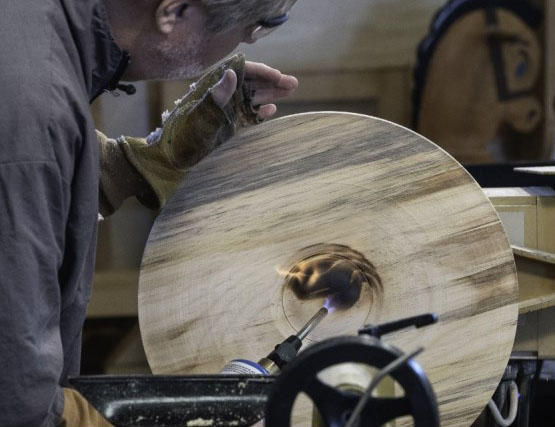
- To begin, you must hold the carver correctly. The blade must be facing up, with the direction arrow of the blade facing towards the rim of the platter (see photos).
- Hold the handle of the carver firmly in your right hand and tuck the body of the carver into your right side using your left hand. You will move the carver with your body, not your arms or hands.
- Holding the carver as described, start the motor, and make sure the top of the blade is spinning towards the rim of the blank. Step up close to the blank, putting your weight on your right foot. Gently place the spinning blade on the blank, just outside of the medallion, and shift your weight to your left foot at a steady pace while the carver moves across the face of the blank towards the rim.
- When the texturing is finished, turn off the lathe and have a look. If the pattern isn’t quite what you like, or isn’t deep enough, you can make another pass or two as described above.
- Do Not Use the Carver on The Rim/Edge of The Blank With The Lathe Running! This can be dangerous, as the carver can break pieces of the blank off and shatter the blank.
- When you are happy with how the texturing looks, you will need to remove any ‘fuzzies’ and sharpness the carver left behind. To do this, use a gray or white ‘Scotch’ abrasive pad/sponge. Be careful, spending too much time in one area can cause some of the texturing to be removed.
- Apply the finish with the piece off the lathe.
- Use a brush to apply the oil so you can get down into all the nooks and crannies of the texturing. Let the oil soak in for about 5-10 minutes, and then remove the remainder with a lint free cloth. Wait about an hour and then apply a second coat using the same method.
- After the front is dry, apply a couple of coats of the same oil to the bottom of the piece with a lint free cloth, letting it dry between coats.