 If you would like your own hardcopy of this description, click here
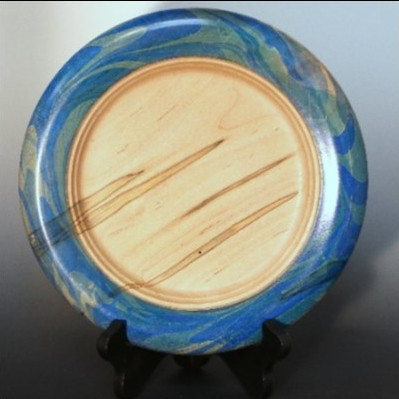
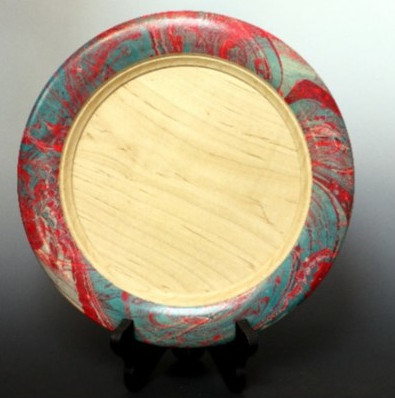
In this demonstration I will turn a platter, marble the rim, and show how the platter is finished. The demonstration will be staged with some pieces pre-prepared because some steps require drying overnight. However, the audience will see every step in the process from the raw blank to the finished platter.
The process can be applied to any turned object, but the platter is one of the easier projects.

- the act, process, or art of coloring or staining in imitation of variegated marble.
- an appearance like that of variegated marble. (dictionary.com)
- Applying coloring on paper or wood through a process of floating color on a medium onto which the paper or wood is dipped. (W. Wager)
Materials needed:
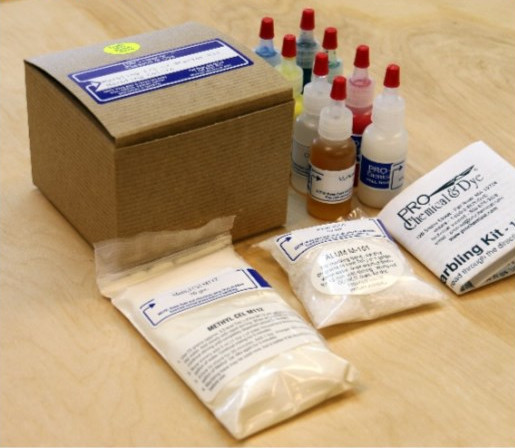
I purchase the materials I use from Pro Chemical Paint and Dye. However, there are many different materials that can be used. Basically, you need a medium onto which the color (paint or dye) is floated. The medium used in this demonstration is Methyl Cellulose. Another common medium is Beta Carrageenan Mordant – A solution such as Alum – (aluminum sulfate), that fixes the color into the fibers of the paper or wood.
Color – The most common colors are acrylic dyes or paints that will float on the medium. There are paints made specifically for marbling, but ordinary artists acrylics can be used.
Surfactant – An additive to the paint that reduces the surface tension allowing the paint to spread across the surface of the medium.
Preparing the platter for marbling:
- Drill or turn a 2 1/8” diameter, ¼” deep mortise on the back of the platter blank
- Turn the back of the platter including the foot and ogive curve to the edge of the rim.
- Reverse the blank in the chuck, expanding the jaws into the mortise. Turn the rim, proportional to the diameter of the platter, leaving the inside of the platter unfinished.
- Sand the rim to 400 grit – wet and raise the grain, sand again
- Coat with alum – dry overnight (if the alum is not dry it will dissolve during the rinsing process.)
Steps in the marbling process:
- Mixing the medium, – 25 grams of Methyl Cellulose to 1 gallon of distilled water. Add 1/2 teaspoon of clear ammonia to facilitate dissolving the methyl cellulose. Also add ½ teaspoon of distilled vinegar to neutralize the ph. Let the solution sit for at least two hours (overnight is best).
- Preparing the paper or wood with Alum. Mix a tablespoon of Alum with a pint of warm water and stir until it is completely dissolved. Paint the sanded wood with the alum mixture and set aside to dry (overnight is best).
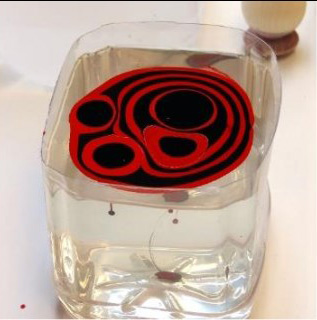
- Preparing the paints to float on the medium (adjusting the dispersion with surfactants.) Some paints are too heavy and will not float on the surface. Thin the paints with water to the thickness of whole milk. Add a drop or two of surfactant to increase dispersion on the methyl cellulose.
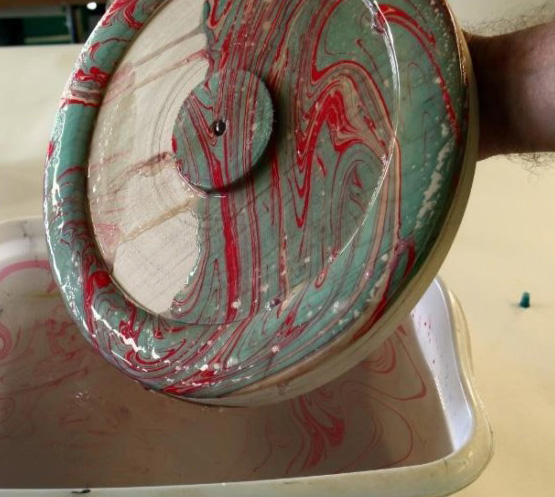
- Distributing the paint on the medium and creating a design. Before adding paint the surface of the methyl cellulose should be skimmed with newsprint or paper towel to remove any bubbles, or material on the surface. There are many methods of putting the paint onto the methyl cellulose. Bulls eye, and random will be demonstrated. A toothpick or marbling comb can be used to create patterns in the paint. 5. Dipping the paper or wood into the medium. A handle of some sort must be fastened to the bottom of the platter in order to control the dipping process. Hot melt glue or double-sided tape can hold a handle onto the back of the platter.

- Dipping the paper or wood into the medium. A handle of some sort must be fastened to the bottom of the platter in order to control the dipping process. Hot melt glue or double-sided tape can hold a handle onto the back of the platter.

- Rinse the methyl cellulose off the surface of the paper or wood. After dipping the methyl cellulose is rinsed off the surface of the platter. The paint will not wash because the alum has fused it to the wood fibers. This can be done with a gentle stream of water or by dipping into a bucket.
- Let the surface dry and coat with a water-proof finish. The painted surface will look dull and weakly colored after marbling, but the finish put over the surface will bring out the color and protect the paint. I found that Krylon acrylic lacquer works well for this. After the lacquer dries buff the rim to a shiny surface.
Remount the platter on the lathe and finish turning the face of the platter.

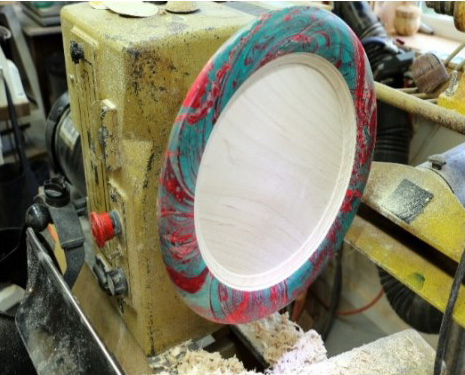
Sand and finish the surfaces of the platter.
The materials I use come from Pro Chemical and Dye https://prochemicalanddye.net/). They have a marbling starter set for about eleven dollars that contains a sample set of 5 different paints and all the chemicals you need, the medium they provide is Methyl Cellulose. The sample set gives you enough methyl cellulose powder (7 Tablespoons (TBS) or 50 gm.) to make 2 gallons of solution. The starter kit also gives you clear ammonia that you add to dissolve the Methyl Cellulose (2 teaspoons) and enough alum (4 Tbls or 60 gm.) to make a half-gallon of solution.
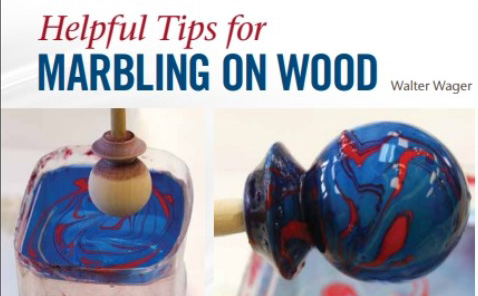
For more information read my Article in the American Woodturner
- American Woodturner, “Helpful Tips for Marbling on Wood,” 33.4:37–41