
You can use ordinary brass plumbing fittings to make your own collets for tool handles. The advantage of using this type of collet is that there are no set screws to damage the shanks on your tool shafts.
I use these Thompson Lathe Tools … unhandled tools from other toolmakers should work.
I found the parts needed in the plumbing department at Fleet Farm. Menards has similar fittings, but, theirs are ‘lead free’ and have different sleeve … I couldn’t make them work.

(For 5/8″ tool shaft)
- 5/8″ Compression x 1/2″ FIP adapter
- Pipe nipple: 1/2″ x 1-1/2″
(For 1/2″ tool shaft)
- 1/2″ Compression x 3/8″ FIP adapter
- Pipe nipple: 3/8″ x 1-1/2″
(For 3/8″ tool shaft)
- 3/8″ Compression x 1/4″ FIP adapter
- Pipe nipple: 1/4″ x 1-1/2″
If you don’t find these at your neighborhood Fleet Farm, try one of their other stores. I found most at the Bellevue store, but, had to go to the Green Bay west side store for one piece.
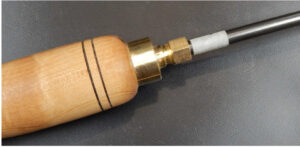
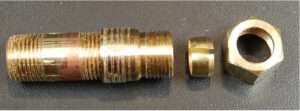
Here are the parts for my 1/2″ collet”

Remove the nut and sleeve from the adapter and tighten the nipple to the adapter. Chuck it up on your lathe and turn the flats off the adaptor (good use for a carbide tool). Use a skew to cut some groves in the portion of the adapter you just turned down (to give the epoxy something to bond to).
The parts should look like this (note: the sleeve has been slotted per the instructions below):
Bore a hole large enough to accept the nipple and adapter in the end of your handle about 1-1/2″ deep. The hole should be as snug as you can make it.
Coat the inside of the hole and the adapter/nipple liberally with epoxy and seat in the hole. Let it dry overnight.

Note: You can make your epoxy go further by mixing in some ‘epoxy filler’. I use West Systems 404, a high-density epoxy thickening additive developed for maximum physical adhesive properties in hardware where maximum strength is necessary. I don’t have a local source for it, but, any dealer that carries West System epoxy products should be able to get it.
This might be a good time to install the copper or brass tube you will use for a ferrule on the tool handle and epoxy it in place.
The adapters have a small shoulder inside … once the epoxy is cured, you’ll need to bore that out (I leave a tenon on the butt end of the tool handle so it can be remounted on the lathe). Drill deep enough so the tool shank doesn’t bottom out. You may also need to enlarge the hole a bit to accommodate the tool shaft … the steel used in Thompson’s tools is actually .015 oversize and the shank fits into the collet is machined so a common drill bit (3/8″, 1/2″ or 5/8″) can be used to bore out the collet. I used a dowel with a slot cut in it and some coarse grit sandpaper to allow a couple of thousandths clearance for the tool shank.
Use a Dremel, Fordham, or other tool to cut a slot all the way through one side of the compression sleeve. This allows the sleeve to compress around the tool shaft when you tighten the nut, but, release it when you loosen the nut.
Put the slotted compression sleeve in the adapter, screw on the nut and insert the tool shaft. If it doesn’t fit, use the dowel and sandpaper to slightly enlarge the hole. You want a snug fit.
When the tool shaft goes in all of the way to the shoulder on the shaft, use an adjustable wrench to tighten the nut and get busy!