
(Click for zip file of 3D printing files referenced in this article.)

I really like using a collet system on tool handles. You can remove the tool steel from the handle for sharpening rather than dancing around the handle. Also, when you buy new tool steel, you don’t have to wait until you make another handle to use it.
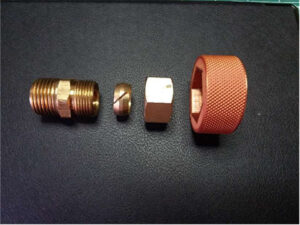
The first tool handle I made (okay, at this point it’s still just a dowel with a hole in the end) I put a fancy collet system on it that costs more than the Thompson steel it holds. Then I learned of Gerald Jensen’s collet system using plumbing fittings. On worldwidewoodturners.org in How To Articles listed as Collet Handle.
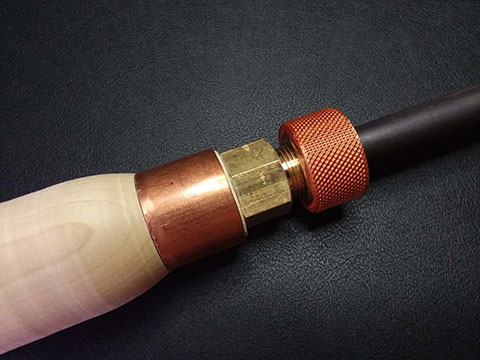
This saves a lot of money that can buy more tool steel. The only thing I didn’t like was that I needed a wrench (spanner to some of you blokes) to tighten and loosen it. Having a 3D printer, I decided to make this function more like the expensive system.
If you don’t have a 3D printer, no problem, the kid down the street does.
I use a program called OpenSCAD to create my parts for 3D printing. I don’t take credit for the knurled surface on this project. This was provided by a library file acquired from Thingiverse or github that someone else created. I simply applied it to a cylinder around the nut. In addition to the STL files, I’m providing the OpenSCAD files so you can modify this any way you like. To use the library, it will need to be in the same directory/folder as the KnurledNutCover file. Start by getting the correct size.
Different printers can have some variation in them. So what my printer produces may be slightly larger or smaller than yours. After all, mine’s just a cheap Anet A8.
To avoid wasting material, time and energy, it is best to print a sizing sample to be sure the part will properly fit your coupler.
I’ve provided three STL files for this (3/8, 1/2 and 5/8).
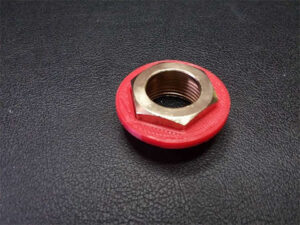
Just print the one you need and if it’s too loose or tight you can set your slicer (the kid will know what this is) to reduce or enlarge by some small percentage until it fits properly. You do want this to be a tight fit, so it should take some effort to put on.
Once you have that percentage, use it for the nut cover when you print that. Be sure to print the part upside-down so you don’t need supports.
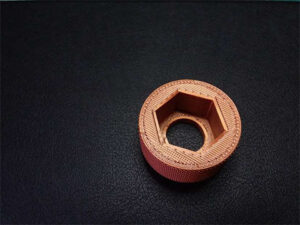
After printing, you may need to ream/drill the hole for the tool steel. My holes never come out perfectly and need some adjustment. The hole should be slightly larger than the tool steel. I also VERY lightly sand the top and bottom of the printed part (routine for 3D printing).
If you want the cover to be a larger diameter, you can create your own STL file using the OpenSCAD file provided. Talk to the kid.
And if the cover starts to come off easily after a lot of use, I suggest a dab of GOOP or E6000 inside the cover.
 STL files for 3D Printing in zip file
Addendum for the Knurled nut cover
When I first published this, I hadn’t used the tool. I just developed the nut cover.
After using the tool, I discovered the cover started getting a bit loose. My
solution to this is to add three drops of flexible adhesive such as Goop or E6000
inside the cover 120 degrees apart. You could use siliconized caulk if that’s what
you have available.
Meanwhile Gary in Oklahoma City had the idea to install the cover from below
the nut making it captive. I’ve noticed some turners using tool handles with collet
systems that have a big hex shape for them to tighten and loosen the collet.
Gary’s idea seems to be a good option for them. Just set the hole size I identified
for the ‘toolshaft’ to the size needed to fit under the nut. I would still suggest a
few drops of flexible adhesive to keep it in place.
Tom Clark