
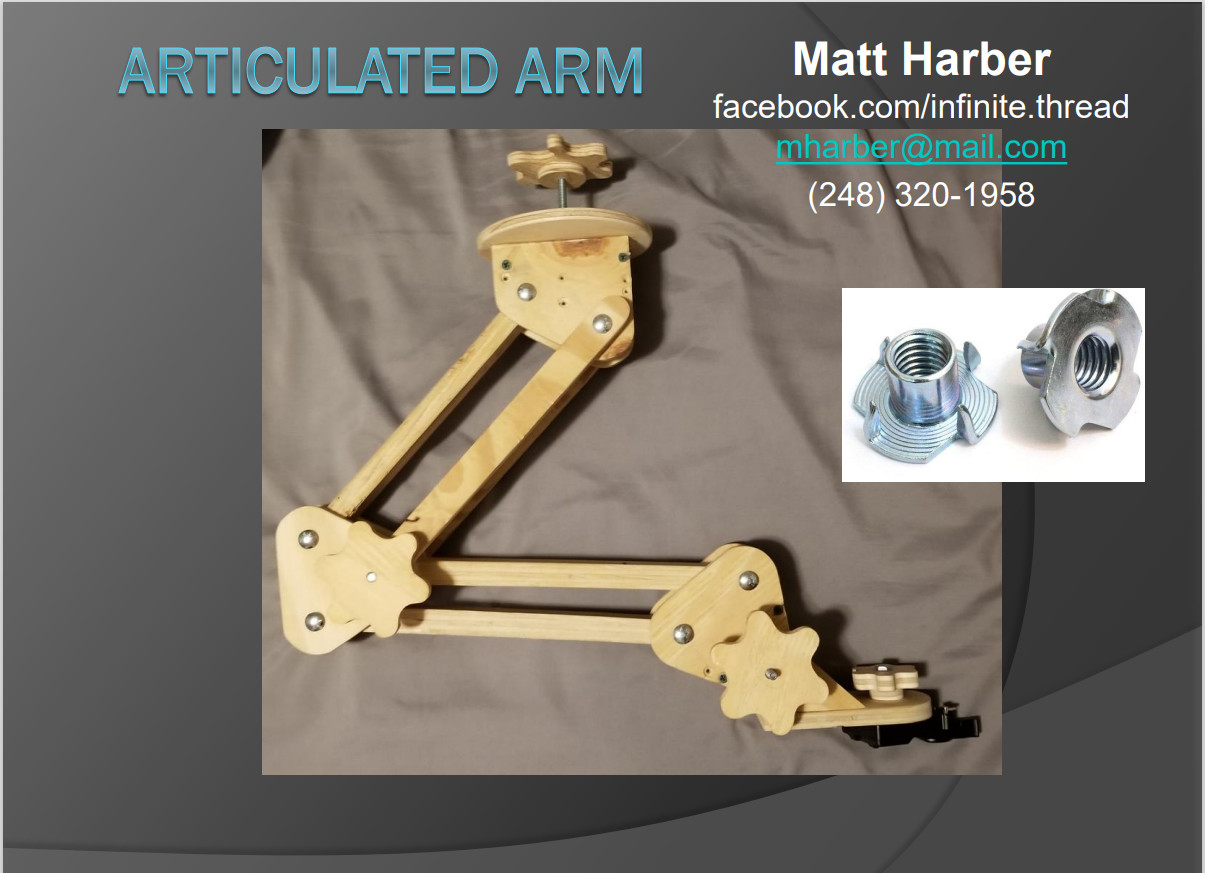
Goals and construction considerations:
- I wanted to have a single, reachable knob to adjust the entire arm.
This implies that at least one set of arms from both adjustable sections must be on the same bolt. - I wanted the base to rotate and be flexible in case I changed my mounting plan.
- Terminus mount must contain a ¼” x 20 t-nut to allow mounting a camera (or web cam) and/or a quick-change mount.
- This arm will hold a camera that will be above my lathe headstock and thus must be adjustable for the piece being turned and techniques employed. It must have an extendable capability to move along my lathe bed, and still rotate either side of the bed, depending on necessary camera angles required.
- Camera terminus needs to be minimal (for ease of use and visual footprint) and adjustable.
Notes, Specifications, Links:
- Bolts, washers, and T-nuts are all ¼” x 20. This is also the common camera
thread dimensions. - Most parts are made from ½” plywood. Exception: 3 of the arms are made
from ¾” plywood for stability. - Base-to-joint arms are 12” long. Joint-to-terminus arms are 13” long. All
arms are 1” wide. Bolt holes are 1” from ends. These can be modified as
needed or required. - When building base, joint, and terminus, remember to leave room inside for
arms to rotate freely. Bolt holes need to be at least 2¼” apart. - Structural cross supports (½” plywood) were added as needed to base and
terminus, along with countersunk ¾” screws. - Links:
Arm video #1: https://youtu.be/gL1N0crTleg
Knob video: https://youtu.be/pxE_cejdZ0g - Glues: Titebond III for wood joints, JB Weld epoxy for t-nuts
Knob construction:
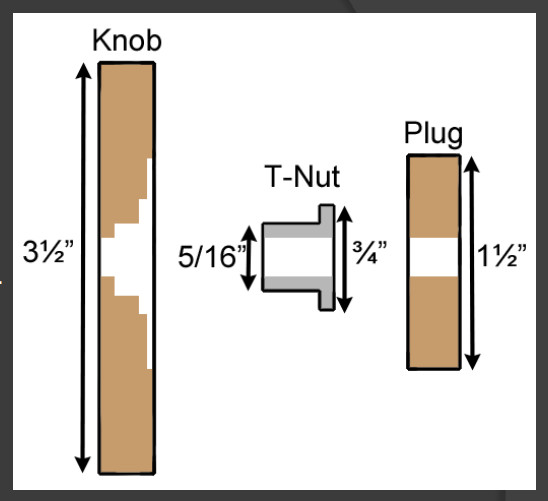
- Mark centers, cut out knob, plug.
- 1½ “ forstner bit, slight depression for plug in knob
- ¾” forstner bit, slight depression to allow T-nut to sit flush in knob. TEST.
- 5/16” forstner bit, hole for outer barrel of T-nut in knob. TEST. Make
sure it is deep enough. - ¼” forstner bit, complete holes in plug and knob.
- Dry-fit test everything, make sure all the holes line up.
- Seat T-nut in knob, making sure it is flush. Light epoxy to keep in place. No epoxy inside the t-nut, in the threads.
- Glue in plug, using a ¼” x 20 bolt to make sure everything lines up. Again, no glue in the threads.
- When cutting out the knob, I use a compass to define the outside (3½“). Then I use a 1” forstner bit centered on the edge, to drill out the knob indentations. Then I use a washer to define the rounded knob edges, trim on the band saw, finish on the belt sander. See the knob video